Wednesday 29 August 2012

Peanut Butter Cup Cupcakes


 The plain peanut butter cup cupcake

The cupcake with the additional 'Reese's Pieces'

Firstly, sorry for the lack of posts over the past week, both Olivia and I were away for a bit, however we both have a few posts for the near future. 

I've recently acquired a new love for 'Reese's Peanut Butter Cups' thanks to a friend introducing them to me (although I'm sure this introduction will in no way benefit my health). Since becoming slightly addicted to them I've wanted to incorporate them into baking somehow and after browsing 'Pinterest' I decided I'd start with some simple cupcakes. The actual cake is just a chocolate sponge (I used the Hummingbird Bakery recipe) however I put a peanut butter cup at the bottom of each cupcake case. I then halved the cake mixture and in one half I put some 'Reese's Pieces' and left the other half plain. 

The cakes turned out light and fluffy and the peanut butter cup at the bottom went slightly soft which was really good. The cakes with the Reese's pieces in them were my favorites I think, (yes, I ate two) as the crunchy candy bits add a different texture to the cakes, the recipe below is therefore for this version. The cakes have a slightly salty taste to them from the peanut butter but I really like this aspect as it means they aren't too sickly. Making these cakes may be the start of a lot of peanut butter baking, I want to make peanut butter cup cheesecake brownies next, another calorific treat. 

Recipe

Makes 10

For the cakes:
          100g plain flour
          20g cocoa powder
          140g caster sugar
          1.5 teaspoons baking powder
          pinch of salt
          40g unsalted butter, softened
          120ml milk
          1 egg
          1/4 teaspoons vanilla extract
          10 Reese's peanut butter cups
          1 packet of Reese's pieces

For the frosting:
          250g icing sugar
          60g unsalted butter
          25ml milk
          25g smooth peanut butter (the amount depends on personal taste)
          Reese's pieces of peanut butter cups to decorate

Method:

  • Preheat the oven to 170C (325F), Gas Mark 3.
  • Put the flour, cocoa powder, baking powder, sugar, salt and butter in a freestanding electric mixer with a paddle attachment (or use a handheld electric whisk) and beat on a slow speed until you get a sandy consistency and everything is combined. 
  • Whisk the milk, egg and vanilla extract together in a jug, then slowly pour about half into the flour mixture, beat to combine and turn the mixer up to high speed to get rid of any lumps. 
  • Turn the mixer down to a slower speed and slowly pour in the remaining milk mixture. Continue mixing for a couple more minutes until the mixture is smooth. Do not overmix.
  • Mix in the packet of 'Reese's Pieces' until evenly dispersed.
  • Place a peanut butter cup in the bottom of each cupcake case.
  • Spoon the mixture into the paper cases until two-thirds full and bake in the preheated oven for 20-25 minutes, or until the sponge bounces back when touched. Leave the cupcakes to cool in the tins slightly before turning out onto a wire rack to cool completely. 
  • For the frosting, beat the icing sugar and butter together with a freestanding electric mixer with paddle attachment or handheld electric whisk until the mixture comes together and is well mixed. 
  • Pour the milk into the mixture and continue to beat until the icing becomes light and fluffy. Mix the peanut butter into the icing by hand, taste it to see whether to add more peanut butter. 
  • Once the cakes are cool, pipe the icing onto the cakes accordingly and decorate how you wish.
Thanks for reading,

Naomi ♥


Monday 20 August 2012

Our Hummingbird Bakery Trip


As we are baking our way through the entire Hummingbird Bakery 'Cake Days' book, Olivia and I thought it was obligatory that we paid a visit to one of their bakeries across London. We went to one of their newer locations, their Spitalfields outlet, as we could then visit Brick Lane after for some retail therapy. The bakery isn't actually in Spitalfields market which I initially thought it would be, instead it's off a side road which was a little confusing to find but we managed eventually (with the help of our phones - where would we be without them?).

When we arrived at the shop it was quite quiet, however whilst we sat and ate our cakes quite a few people came to pick up some delicious treats. I really liked the way it was set out, with a choice to sit inside or outside, however we were both slightly disappointed by the selection of cakes available. The book is obviously so full of varying recipes, but the shop, I find, didn't represent this. The majority of the cakes were the classics, red velvet, carrot, vanilla, chocolate etc, they then had their daily special -  which on the day was a Coffee Frappe Cupcake, as they are currently doing a 'Milkshakes and Frappes' period, where each day there is a different cupcake of this theme.

So overall we both really enjoyed our trip to Hummingbird and would definitely recommend a visit, however if we could change one thing then we would perhaps suggesting having a slightly more varied selection of cakes for customers. Check out their website to see where there other locations are.

My Coffee Frappe cupcake, this was really nice and the butter icing wasn't too sickly so really topped off the cake well.

Olivia's Raspberry Cheesecake Brownie, she really enjoyed it, however the slice was quite large - although that's not always a bad thing!

Olivia then bought two cupcakes to take home and we had to put a picture of the really cute box they give you to carry it!

Red Velvet Cupcake

Carrot Cupcake

Thanks for reading,

Naomi and Olivia ♥

Saturday 18 August 2012

Chocolate Chunk Cookies


Olivia and I have been wanting to make cookies for a while now as neither of us have made any in so long! I love big American style cookies (I usually microwave them so they're nice and warm) so that's the type we went for. We used a recipe from a website I found called 'Our Kitchen', it's a really lovely site with lots of tasty recipes to try. 

Our cookies were white and milk chocolate chunk, we made the chunks quite big simply due to our own personal preference. They tasted really good and we were both happy with them, the only thing is, was that they took quite a bit longer in the oven than the website initially suggested. We decided to try two ways of molding the cookies, some we flattened out and others we simply left as mounds. There wasn't really a difference between the two, apart from that the flattened ones took slightly less time in the oven (so were maybe a bit more ideal). The recipe is American so the measurements are given in cups, however you can easily convert it, or just use some measuring cups as we did.

Recipe
(Our Kitchen)

Makes 20

Ingredients:
          2 cups plain flour
          1/2 tsp salt
          1/2 tsp baking powder
          170g unsalted butter, melted and allowed to cool a little
          1 cup light brown sugar
          1/2 cup granulated sugar
          1 large egg, beaten
          1 egg yolk
          2 tsp vanilla extract
          1 1/2 cups chocolate chunks

Method:

  • Preheat the oven to 165C on fan bake and arrange the oven shelves so they are spaced evenly at about 1/3 and 2/3 down the cavity and the hot air can circulate freely around them. Lightly grease or line two baking trays.
  • Sieve the flour, salt and baking soda into a medium-sized bowl.
    •  
    • Combine the melted butter and sugars in a large bowl. Add the eggs, extra egg yolk, and vanilla extract and mix until well combined.
    • Add the flour and chocolate chunks and stir until just combined.
      • Divide the dough evenly into twenty pieces and roll into balls. Space them evenly on the oven trays, allowing plenty of room for them to spread. Bake for between 15 – 20 mins until light brown. The darker the cookies, the crisper they will be.


          • For triple choc cookies, try adding 1 tbsp cocoa when sieving flour


Thanks for reading, 

Naomi ♥

Thursday 16 August 2012

Summer Fruits Tart


I wanted to make a really nice yet simple summer dessert for a weekend BBQ.  Looking through the Hummingbird Book I came across a Peach and Raspberry tart that I thought sounded perfect.  I didn't have time to go to the shops so I made do with the ingredients that I had in the house which is another reason why this recipe was perfect. I didn't have any peaches in the house but I did have an abundance of summer fruits that I thought would work just as well on the tart.

I started by making the pastry base and then whilst that was cooling I made the filling.  The tart is really quite simple to make, however, as the different components need to set for a certain amount of time you would need to allow about 4 hours altogether before you could eat it or maybe do some the night before and finish it off in the morning.

It is a really nice, light dessert that is perfect for summer BBQ's and looks quite impressive despite it's simplicity.  I would definitely make this tart again!

Why not try a different topping? It's such a versatile tart that you could alter the fruit topping without too much trouble making it perfect for individual different tarts to suit people tastes.  I also did a Strawberry and Kiwi tart which tasted just as good!


Top Tip: For pastry you need to 'blind bake' it, for this baking beans are required.  However, if you don't have baking beans something else heavy will do just as well, for example you could use ordinary rice that you have around the house.

Recipe
(Cake Days - The Hummingbird Bakery)

Serves 8-10

For the Pastry:
110g (4oz) unsalted butter, softened
225g (8oz) plain flour, plus extra for dusting
80g (3oz) caster sugar
1 large egg

For the Filling:
500ml (18fl oz) whole milk 

1/4 tsp vanilla essence
5 egg yolks
200g (7oz) caster sugar
20g (3/4oz) plain flour
20g (3/4oz) cornflour
150ml (5.5fl oz) double cream

For the Topping:
Fruit of choice however the book uses 4 peaches and 100g (3.5oz) raspberries
30g (1oz) caster sugar, for sprinkling
Handful of fresh mint leaves

Method:

  • Using a freestanding electric mixer with the paddle attachment, mix the butter and flour on a low speed until it has a crumb-like consistency. Add the sugar, then the egg, mixing gently to incorporate. Alternatively, rub the butter and flour with your fingertips, then stir in the sugar and egg. When a dough forms, remove from the bowl and knead gently on a floured work surface to bring it together. Cover in cling film and place in the fridge to rest for 20-30 minutes.
  • Once rested, roll out the pastry on a lightly loured surface to about 5mm (1/4 in) thick, and large enough to fit your tart in. Gently press the pastry down into the base and sides of the tin and cut away any overhang. Prick the base several times and put the tart case in the fridge to rest for 20-30 minutes. 
  • Preheat the oven to 170C (325F), Gas Mark 3. Once the tart base has rested, line with baking parchment and fill with baking beans, then place in the oven and bake 'blind' for 12 minutes. Carefully remove the beans and paper and bake the pastry for another 15 minutes or until cooked through and lightly golden in colour. Set aside to cool.
  • While the pastry is baking, make the filling. Bring the milk and vanilla essence to the boil in a saucepan. In a bowl, mix together the egg yolks, sugar, flour and cornflour to a thick paste. If it is too dry to come together, add 1 tablespoon of the hot milk to loosen it up. 
  • When the milk has come to the boil, remove from the heat and add 4-5 tablespoons to the bowl of paste, stirring until the paste becomes a thick liquid. Pour this into the pan of milk and set over a low heat. Stirring constantly, bring to the boil and allow to thicken - boil for at least 1 minute to fully cook the flour. Pour this custard on to a baking tray to cool, covering straight away with cling film so that it doesn't develop a skin. Allow the custard to cool completely for 30-40 minutes.
  • Whip the double cream, either by hand or using a hand-held electric whisk, until soft peaks form. Scrape the cooled custard into another bowl, stirring to break it up and until the texture is completely smooth. Fold the whipped cream into the custard, then pour into the cooked tart case and place in the fridge to set for 1-2 hours.
  • When the custard cream has set, arrange the sliced peaches and raspberries on top, sprinkle with sugar and scatter with mint leaves. Once the fruit has been added, the pie is best-eaten straight away. 
Thanks for reading, 

Olivia x x 

Tuesday 14 August 2012

Victoria Sponge


With the return of The Great British Bake Off I decided to make a classic British cake, in my mind Victoria Sponge cakes, although so basic, are one of life's great pleasures. A moist, light sponge sandwiched with freshly whipped cream and berries or jam is such a Summer combination and no serious tea and cake session should be without it. 

I got my basic recipe from 'Jamie' magazine, the jubilee issue, so it's full of lovely cake recipes which I'd love to try in the future. However I wanted to jazz up the basic recipe a bit so I put a bit of elder flower cordial in when I was whipping the cream. I'm aware that the elder flower season has been and gone but I had some cordial in the house so thought I'd give it a go. The cake itself turned out well, however you couldn't taste the elder flower as much as I would have liked unfortunately, maybe i'll add more another time, or a less concentrated syrup.

Did anyone else watch the bake off tonight? I think I've got a favourite already, hello James! 

Recipe
(Georgie Socratous - Jamie Magazine)

Serves 14


Ultimate Victoria Sandwich:
225g unsalted butter cubed and softened, plus extra to grease
225g white caster sugar
1 tsp vanilla extract
4 eggs, beaten
225g self-raising flour, sifted 
1 tsp baking powder
1/4 tsp salt
A splash of milk 
200ml double cream
250g fresh strawberries
1 tbsp elder flower cordial
1 1/2 tbsp icing sugar plus extra to dust 

Method:

  • Preheat the oven to 180C/Gas Mark 4. Grease and line the bases of 2 round 20cm sandwich tins. Cream the butter and sugar together in a large mixing bowl until pale and fluffy. Mix in the vanilla extract.
  • Gradually mix the beaten eggs into the creamed and sugar. Fold in the flour, baking powder and salt with a large metal spoon just incorporated (don't overmix).
  • Stir in a splash of milk to loosen the batter, then evenly divide it between the 2 cake tins. Bake the cakes in the oven for 22-25 minutes, until golden and cooked through. (To test, insert a skewer into the middle of a cake; it's ready when the skewer comes out clean.) Leave to cool in the tins for 5 minutes, then turn onto a wire rack to col completely.
  • Hull and roughly slice the fresh strawberries. Pour the cream into a large bowl and whisk until you have soft peaks. Sift in the icing sugar and gently fold through, stir through the elder flower cordial and taste. 
  • Place one of your cakes on your chosen plate or cake stand and spread over the cream, but not right to the edges or it will spill later. Scatter the strawberries and top with the second cake. 
  • Dust with icing sugar and decorate with extra strawberries, if you like. 

Thanks for reading, 

Naomi ♥

Monday 13 August 2012

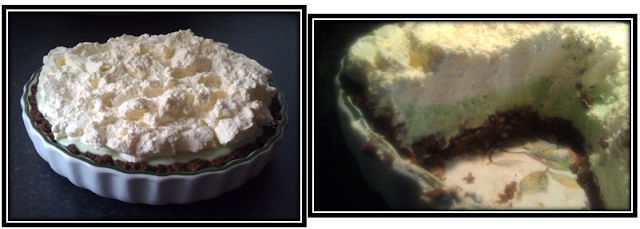
Grasshopper Pie


After looking through the Hummingbird Book I came accross this Grasshopper Pie which I thought looked really different and could potentially be really good.  It's got a chocolate biscuit base, marshmallowy minty centre with a whipped cream topping, so it's got loads of different flavours and textures and mint and chocolate always go really well together.

I had pretty high expectations for the pie, however, I must admit I was a bit disappointed with it although it's nothing that can't be improved next time.
1) The chocolate base is made just like a cheesecake base would be, the book doesn't tell you to grease the dish at all which I was a little bit sceptical about but thought i'd follow the recipe first time round and then ammend it next time.  The base stuck to the dish quite a bit so next time i'd reccommend greasing in some way. (As the base really stuck, it was really hard to cut slices that were worth photographing and left the cake looking not so pretty, so please excuse the photography on this one!)
2) The filling wasn't as minty as I was expecting, I personally, along with the other people who tried it, would prefer more mint in it. If you want a really subtle flavour then the amount they use in the book is fine but then depending on how flavoursome you want it I would reccommend adding more mint essence.
3) I found the whipped cream on top really overpowering and probably too much in ratio with the rest of the pie. I'm not a big cream lover, so would personally not put the cream on top next time. There are many different Grasshopper Pie versions, some with cream, some without, so depending on your preference you can try either.

Anyway, now the negatives are over and done with, the overall texture of the pie was really nice.  I loved the gooeyness of the filling against the crunch of the biscuit.  I really love the flavour of mint with chocolate and so with some small ammendments I think this could be a really good pie.  I will try this pie again adding more mint this time and maybe experimenting with some new topping ideas or even without a topping and will blog about it to let you all know how it went!

Recipe
(Cake Days - The Hummingbird Book)

Serves 10-12

For the Biscuit Base:
250g (9oz) chocolate-flavoured biscuits or double-chocolate cookies
175g (6oz) unsalted butter, melted

For the Filling:
180g (6.5oz) large white marshmallows
180ml (6.5fl oz) whole milk
1/4 tsp peppermint essence
1/4 tsp green food colouring 
700ml (1 pint 4fl oz) double cream
Chocolate shavings to decorate (optional)

one 23cm (9in) diameter pie dish or loose bottomed tart tin


Method:

  • In a food processor with the blade attachment, blitz the chocolate biscuits into a fine crumb. Alternatively, place in a plastic bag, seal the bag shut and crush with a rolling pin. Pour the crumbs into a bowl and add the melted butter, mixing until all the crumbs are coated and can be squeezed together.
  • Tip the crumb mixture into the pie dish or tart tin, pressing it into the base and sides, then place in the fridge and leave for 30-40 minutes to set completely. 
  • Meanwhile, make the filling. In a saucepan over a low heat, melt the marshmallows in the milk. Remove from the heat, then add the peppermint essence and food colouring and stir into the marshmallow mixture until it is evenly green in colour. Set aside to cool for 10-15 minutes. 
  • Pour 300ml (10.5fl oz) of the cream into a bowl and whip into soft peaks either by hand or using a hand-held whisk, then fold into the marshmallow mixture. Pour the filling into the chilled biscuit base and leave in the fridge for 1-2 hours to set completely. 
  • Once set, whip the remaining cream and spoon on to the top of the pie. You can also sprinkle with chocolate shavings if you wish. 
Thanks for reading,

Olivia x x


Saturday 11 August 2012

Strawberries and Cream Cheesecake


In an attempt to celebrate the London 2012 Olympics and Team GB's great performance, Olivia and I thought we would try to make something 'quintessentially' British. After looking through the Hummingbird book we settled on the Strawberries and Cream cheesecake, although traditionally associated with Wimbledon, the combination of the fruit and cream is still in keeping with a very British summer (or lack of this year). 

The cake does take quite a long time to make from start to finish due to the various steps and periods of time where the cake must be left to cool or set between stages, however the actual process isn't too hard. We did encounter some problems whilst making the cheesecake, the main one being that our tin was smaller in terms of width, which meant that it was much deeper and subsequently took longer in the oven. Another thing that we believe may have been affected by the size of the tin is that all the strawberries sank to the bottom instead of being 'evenly dispersed', therefore we thought that if we make it again with the same dish we would add more strawberries to perhaps compensate. Despite these mishaps, the cake was good and in my opinion would be perfect for a summer barbecue (which I'm having later today so can put this idea to the test).

Olivia's Top Tipwhen making dishes with a biscuit base, a really good way of pressing the base down is by using a potato masher, it's a much easy way of achieving a really compact bottom.

Recipe
(Cake Days - The Hummingbird Bakery)

Serves 10-12

For the Base:
          220g (8oz) digestive biscuits
          100g (3.5oz) unsalted butter, melted


For the Topping:
          200g (7oz) fresh strawberries, hulled and chopped, plus 100-200g (3.5-7oz) extra
          strawberries, cut in half, to decorate
          180g (6.5oz) caster sugar
          600g (1lb 5oz) full-fat cream cheese
          2 large eggs

          100g (3.5oz) mascarpone cheese
          20g (3/4oz) icing sugar
          100ml (3.5fl oz) double cream

one 20cm (8in) diameter spring-form cake tin

Method:

  • Line the base of the tin with baking parchment. Using a food processor with the blade attachment, blitz the biscuits into fine crumbs. Alternatively, place them in a plastic bag, seal and crush with a rolling pin. 
  • Pour the biscuit crumbs into a bowl, add the melted butter and stir together, then tip into the lined tin and press into the base with the back of a spoon. Place the tin in the fridge for 20-30 minutes to allow the base to set.
  • Meanwhile, place the strawberries in a saucepan with 80g (3oz)  of the sugar and 30ml (1fl oz) of water and bring to the boil. Reduce the heat and cook until the strawberries are soft and the liquid has reduced by half. Take off the hob and set aside until completely cold. 
  • Preheat the oven to 160C (320F), Gas Mark 3. Prepare the topping by using a hand-held electric whisk or a freestanding electric mixer with the paddle attachment to beat together the cream cheese and remaining sugar on a medium speed until smooth. Add the eggs one at a time, mixing well after each addition and scraping the sides of the bowl now and then. Tip in the cooked strawberries and stir in by hand, ensuring that they are evenly dispersed. 
  • Pour the mixture into the prepared tin -  it should be about two-thirds full. Place in a roasting tin (first wrap the cake tin in foil) and fill this with water up to about 5mm (1/4in) from the top of the cake tin. This creates a water bath in which to bake the cheesecake, preventing it from drying out and cracking in the oven. 
  • Bake for approximately 30 minutes or until firm on top with a very slight wobble in the centre. Allow the cheesecake to cool to room temperature still in the tin, then place in the fridge to chill and set for 1-2 hours. 
  • Using the electric whisk or freestanding electric mixer, beat the mascarpone and icing sugar on a medium speed until smooth. In a separate bowl, whip the double cream until soft peaks form, then fold it into the mascarpone. 
  • Remove the chilled cheesecake from the fridge and pour the mascarpone cream on top, spreading it evenly. Place back in the fridge for a few hours, or preferably overnight, to set. 
  • When you are ready to serve, carefully remove the cheesecake from the tin and top with fresh strawberry halves. 

Thanks for reading,

Naomi ♥

Wednesday 8 August 2012

Sweet and Salty Chocolate Cake


It was my brothers birthday the other day, so making a cake was mandatory of course. I decided to make this chocolate cake as it reminded me of the one in 'Matilda', a childhood classic and being a typical boy I know it would not disappoint, and it didn't. Even though I'm pretty sure that one slice is your entire calorie intake allowance for the day, it's worth it. A deep chocolate cake sandwiched with salted caramel and chocolate fudge icing, this one really isn't for the dieters of the world. 

The downside to this cake is that is does take a long time to make due to the various different steps there are, but sometimes you're just in one of those moods to bake all day, if so then this cake is ideal. You start by making the salted caramel, this stage went a little bit wrong for me as I don't think I boiled the sugar and golden syrup for long enough, so when I added the boiled cream it didn't 'bubble' up as they said it would, which resulted in the caramel not setting very well and ending up more like a caramel syrup. However this did not ruin the cake as it still had flavour and simply soaked through the sponge layers. The rest of the cake went smoothly and I was very happy with the result, now my family and I simply have to finish it. 

Also, The Great British Bake off is back next Tuesday (14th August) and I am for one, so so excited to see Mrs Berry and Mr Hollywood back on our screens with a new group of baking hopefuls. T.V highlight of the year! 

Recipe
(Cake Days - The Hummingbird Bakery)


Serves 10-12


For the Sponge:
          300g (10.5oz) unsalted butter, softened
          300g (10.5oz) caster sugar

          140g (5oz) soft light brown sugar
          3 eggs
          100g (3.5oz) cocoa powder
          160ml (5.5fl oz) buttermilk
          1tsp vanilla essence
          330g (11.5oz) plain flour
          2 tsp baking powder
          1 tsp bicarbonate of soda
             1/2 tsp salt

For the Salty Caramel:
          200g (7oz) caster sugar

          2tbsp golden syrup
          120ml (4fl oz) double cream
          60ml (2fl oz) soured cream
          1 tsp fine sea salt

For the Frosting:
          200g (7oz) caster sugar
          2 tbsp golden syrup
          360ml (12.5fl oz) double cream
          450g (1lb) dark chocolate, chopped, plus extra to decorate
          Sea salt flats, for sprinkling

Three 20cm (8in) diameter loose-bottomed sandwich tins


Method:

  • First make the salty caramel. In a small saucepan bring the sugar and golden syrup to the boil with 60ml (2fl oz) of water, allowing the mixture to boil for about 10 minutes, during which time it should become quite syrupy and a rich caramel colour.
  • Put the double cream, soured cream and salt in a separate pan and bring to the boil, then remove from the heat. The salt should completely dissolve in the cream.
  • When the sugar syrup is ready, remove it from the heat and carefully add the hot cream. It will bubble up as you pour in the cream, but smooth out again quickly after that, becoming a creamier golden colour. Pour the caramel into a small bowl and set it aside to cool while you make the frosting. 
  • In a small, clean saucepan, bring the caster sugar and golden syrup to the boil with 60ml (2fl oz) of water, again letting this boil for approximately 10 minutes or until it is syrupy and caramel-coloured. 
  • In a separate pan, bring the double cream to the boil. Carefully pour the hot cream into the caramel: as before, it will bubble up, but settle again shortly afterwards. Set this caramel aside to cool slightly.
  • Once it has cooled, add the chopped chocolate stirring constantly while the chocolate melts. Using a hand-held electric whisk, mix the frosting for about 10 minutes or until the bottom of the bowl feels cool.
  • Add the butter to the chocolate caramel frosting and whisk together until the mixture is light and looks slightly whipped. Place the frosting in the fridge to cool and set for 40-50 minutes while you make the sponge.
  • Preheat the oven to 170C (325F), Gas Mark 3, and line the bases of the sandwich tins with baking parchment. 
  • Using a freestanding electric mixer with the paddle attachment, or a hand-held electric whisk, cream together the butter and both types of sugars until light and fluffy. Add the eggs one at a time, mixing well after each addition and scraping down the sides of the bowl. 
  • In a jug stir together the cocoa powder, buttermilk and vanilla essence with 60ml (2fl oz) of water to form a thick paste. Sift together the remaining sponge ingredients, then add these in stages to the creamed butter and sugar, alternating with the cocoa powder paste and mixing thoroughly on low-to-medium speed until all the ingredients are incorporated. 
  • Divide the batter between the three prepared cake tins and bake for approximately 25 minutes or until the top of each sponge feels springy to the touch. Allow the sponges to cool slightly in their tins before turning out on to a wire rack and cooling completely before assembling. 
  • Once the sponges feel cold to the touch, place one of a plate or cake card and top with approximately 2 tablespoons of the salty caramel, smoothing it over the sponge using a palette knife. Top the caramel layer with 3-4 tablespoons of the frosting and smooth it out as before. 
  • Continue this process, sandwiching together the other two sponges with the remaining salty caramel and a layer of frosting and leaving enough frosting to cover the sides and top of the cake. To finish, decorate the top with chopped chocolate and a light sprinkling of the sea salt flakes. 

Thank you for reading,

Naomi ♥

Tuesday 7 August 2012

Cinnamon and Raisin Loaf


I am a real lover for cinnamon and so really wanted to try this loaf which used raisins and cinnamon which are a great combination, so already I knew it was going to be good. On top of this it's actually a really simple loaf to make and the marbled effect gives it a really nice finish and actually makes it look more complicated than it is!
You make the loaf mixture then half it mixing raisins into one half and cinnamon into the other, you can then swirl both the mixtures together in the loaf tin to give the marble effect but making sure you don't mix them in together too much!

All of the Hummingbird cooking times are based on conventional ovens, however, I always bake my cakes using a fan oven so therefore turn down the heat to compensate.  I think I may have turned it down slightly too much as it did take longer to cook than the book said, however when using a fan oven and changing the temperatures it does mean you have to keep an eye on it more.

Despite this, it still cooked well and turned out nice.  It was a really nice light and moist cake which was probably due to the soured cream ingredient. The cinnamon was quite subtle in the loaf which was quite nice, obviously everyone has different tastes so if you want it to have a stronger flavour you just simply add more in.  I will definitely make this again, not only because it tasted great but also because of it's simplicity.

Recipe
(Cake Days - The Hummingbird Bakery)

Serves 8-10

Ingredients:
               190g (7oz) unsalted butter softened, plus extra for greasing
               190g (7oz) plain flour, plus extra for dusting
               190g (7oz) caster sugar
               3 eggs
               1 tsp baking powder
               1/4 tsp salt
               25 ml (1fl oz) soured cream
               1 tsp vanilla essence
               1tbsp ground cinnamon
               70g (2 1/2oz) raisins

one 8.5 x 17.5cm (3 1/2 x 7 in) loaf tin with 7.5cm (3in) sides

Method:

  • Preheat the oven to 170C (325F), Gas mark 3, then grease the loaf tin with butter and dust with flour
  • using a hand-held electric whisk or a freestanding electric mixer with the paddle attachment, cream together the butter and sugar until pale and fluffy.  Break the eggs in one at a time, mixing well after each addition and scraping down the sides of the bowl to make sure all the ingredients are fully incorporated.
  • Sift together the flour, baking powder and salt, then add to the batter in two batches and mix on a low speed until just incorporated.  Finally, mix in the soured cream and vanilla essence.
  • Spoon about 200g (7oz) of the batter into a small bowl and stir in the cinnamon.  Stir the raisins into the remaining batter, then pour this batter into the prepared loaf tin.  Spoon the cinnamon batter on top and swirl the two together for a marbled effect.
  • Bake the loaf in the oven for 50-60 minutes or until the sponge feels firm on top and a skewer inserted into the centre of the loaf comes out clean of any uncooked batter.  Allow the loaf to cool a little before turning it out of the tin on to a wire rack to cool completely before you serve it.

Thanks for reading,

Olivia x x


Friday 3 August 2012

Caramel Cupcakes


Sorry for the slight lack of posting this week, we've both been pretty busy but don't worry we have a few posts coming up. I did however get time do make these caramel cupcakes from the Hummingbird book. The actual cake is quite sweet due to the caramel you put in the sponge but it's not too overpowering and it makes the cakes really moist which is always good. There is caramel in the icing as well so overall it's a pretty sugar based cake, but my sweet tooth definitely doesn't mind that. I decided to decorate them in a variety of ways, copying the book a bit and putting my own touch on it too. I really love the look of the piped caramel into hearts and dots, I think they look really neat and generally pretty cute.
Overall these cakes were a great success and were eaten quickly in my house so they are definitely ones to make again, or for anyone that hasn't made them, I'd highly recommend it! 


Recipe
(Cake Days - The Hummingbird Bakery)


Makes 12-16 cupcakes


For the Sponge:
          80g (3oz) unsalted butter, softened
          280g (10oz) caster sugar
          240g (8.5oz) plain flour
          1 tbsp baking powder

             1/4 tsp vanilla essence 
          2 large eggs
          150g (5.5oz) tinned caramel or dulce de leche


For the frosting:

          500g (1lb 2oz) icing sugar
          160g (5.5oz) unsalted butter, softened
          50ml (13/4fl oz) whole milk
          100g (3.5 oz) tinned caramel or dulce de leche, plus extra to decorate (optional)


one or two 12-hole deep muffin tins


Method:


  • Preheat the oven to 190C (375F), Gas Mark 5, and line a muffin tin with cases.
  • Using a hand-held electric whisk or a freestanding electric mixer with the paddle attachment, whisk together the butter, sugar, flour, baking powder and salt on a low speed until crumb-like in consistency. 
  • Place the milk and vanilla essence with the eggs and whisk by hand until combined. Pour three-quarters of this mixture into the dry ingredients and mix together on a slow speed, then increase the speed to medium and keep beating until smooth and thick. Scrape down the sides of the bowl, then add the remaining milk mixture and the tinned caramel, and continue to mix until all the ingredients are incorporated and the batter is smooth. 
  • Divide the batter between the muffin cases, filling each by two-thirds. Any remaining batter can be used to fill one to four more cases in  a separate tin. Place in the oven and bake for 18-20 minutes or until well risen and springy to the touch. Leave to cool for a while in the tin, then transfer to a wire rack to cool down fully while you make the frosting.
  • Using the electric whisk or freestanding mixer with the paddle attachment, beat the icing sugar with the butter on a low speed until combined and still powdery in texture. Slowly mix in the milk, and once it is incorporated, increase the speed to high and whisk until light and fluffy. Add the caramel and beat well.
  • Spoon the frosting on to the cupcakes once they have cooled, smoothing it on with a palette knife and swirling the frosting. If you want to decorate the cakes, spoon some tinned caramel or dulce de leche into a piping bag with a small nozzle and pipe on to the cakes in little hearts, or whatever shape takes your fancy.

Thanks for reading,

Naomi ♥


Related Posts Plugin for WordPress, Blogger...